
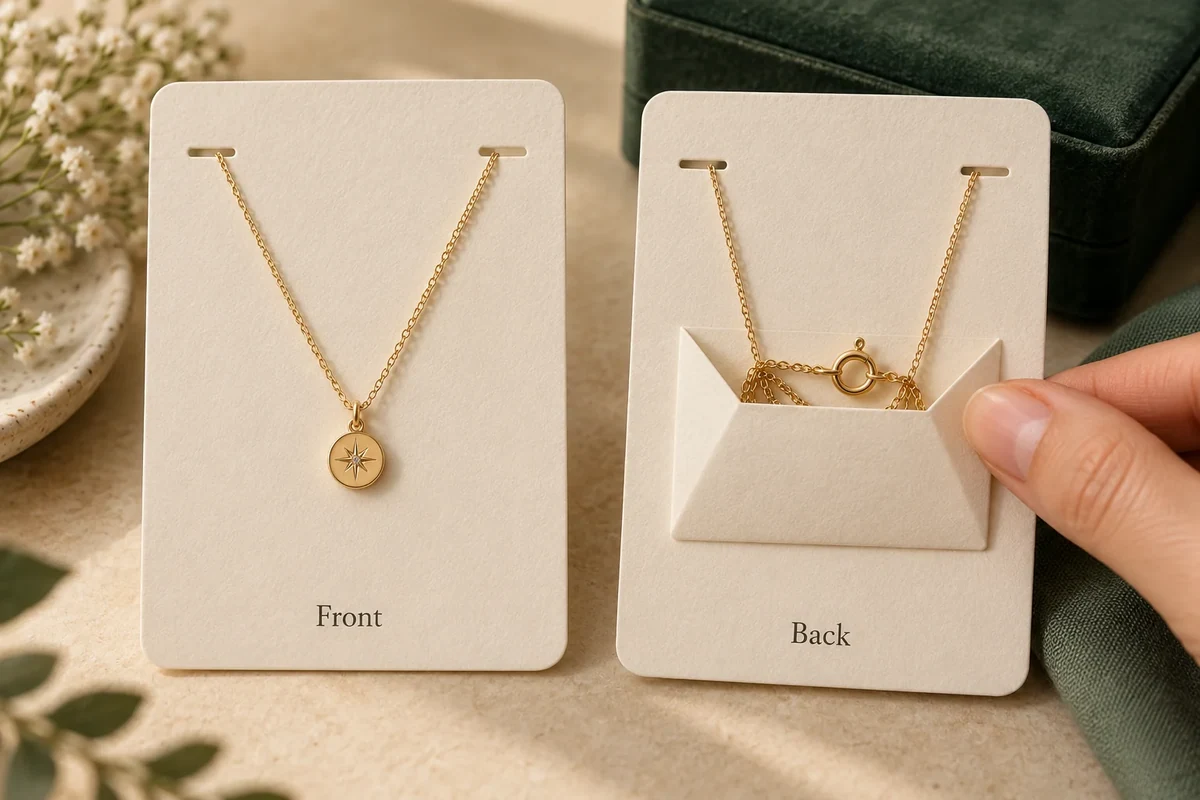
Plan a pendant chain route by separating the displayed length, the chain stored behind the support and the clasp the customer needs to reach. Check loading and removal with the actual jewelry and complete box. The route should preserve the intended presentation while leaving each fastening and release point identifiable for the packer and customer.
Use the Jewelry Mounting Cards: Check Attachment and Rear Clearance to compare the front-and-back support arrangement when describing the chain route. Confirm the actual card, clasp position and removal action in a sample; the concept does not establish the route for your necklace.
A necklace can look tidy from the front while its chain bunches behind the card. That hidden arrangement matters when the insert seats, the lid closes and the customer lifts the pendant. Review both sides before deciding that a presentation direction is ready for sampling.
Draw the route before choosing the retaining detail
Photograph the necklace in its proposed display position. Mark the pendant, chain attachment points, clasp and any adjustment section. Record the full necklace length and the part you want visible. Keep those measurements tied to the actual jewelry version.
Describe the remaining chain's intended destination. It might rest behind a mounting card, sit within a proposed paper pocket or follow another supplier-designed support. Ask the supplier to explain how that arrangement loads and releases. A pocket drawn in a concept image is still a proposed component.
Identify surfaces you want kept apart. The pendant may need separation from the clasp or loose links during the intended handling. The Canadian Conservation Institute's metal care guidance discusses limiting contact and physical damage during storage and handling. It provides context, not a retail jewelry material specification.
For the practical brief, describe the chain finish and any contact concerns to the jewelry and packaging suppliers. Ask for compatible contact materials to be proposed and reviewed. Avoid selecting a fabric or foam only because it looks soft in a photograph.
The insert measurement guide covers projections and chain storage alongside the box interior. Add a route drawing that shows which of those spaces the chain actually uses.
Make the rear arrangement visible
Show the back of the support with the chain loaded. Label the stored section and where the clasp remains accessible. Include the card's resting position in the box so the drawing doesn't imply space that the assembled insert has already occupied.
Check whether the chain crosses a fold, presses on an insert edge or shares space with another accessory. Keep the rear view and the assembled view together. A route can be clear on a loose card yet become difficult to reach after that card is fixed in place.
Treat each retaining detail as a question to answer. A slit, fold, tie or pocket may change how the packer handles the chain. Ask which parts are formed by the supplier and which are completed during packing, then trial that sequence with the intended operator.
This original route record can be copied into a supplier brief. Complete the open fields using the proposed construction and actual necklace.
| Route segment | What to show | Observation to record |
|---|---|---|
| Front display | Pendant position and visible chain length | Alignment and contact with the support |
| Front-to-rear transition | Exact opening, fold or retaining detail | Catching, bending or loading difficulty |
| Rear storage | Position of the remaining chain | Bunching and contact when the support seats |
| Clasp access | Location and intended hand access | Whether removal requires pulling hidden links |
| Customer release | Order of releasing chain and lifting pendant | Snagging, unintended force or unclear steps |
A concept drawing can explain these segments. It cannot establish that the chain releases cleanly, that a material is compatible with its finish or that the complete pack protects it during delivery. Those questions need the appropriate physical evidence.
Trial loading and removal in a defined order
Begin with the necklace and the empty support. Load it using the proposed instructions without improvising another loop or hiding the clasp in a different position. Record any step that needs an extra tool, repeated adjustment or a second person.
Seat the loaded support in the box and close it as intended. Observe whether the rear chain changes the support's height or moves toward a closure. If a card or care leaflet is included, add it in the same order the packer will use.
Open the complete pack and follow the customer release sequence. Reach the identified clasp or release point first, then lift the pendant as instructed. Note where the chain catches, where the support moves and whether the user can see what to release next.
Keep the observations descriptive. "Links caught at the rear card fold during removal" gives the supplier a location and an action. "Chain tangles" may describe several different problems, including the storage layout, jewelry handling or an unclear release sequence.
Repeat the route review for the necklace versions it is supposed to cover. A different clasp, extension section or pendant setting can change the packed arrangement. The multi-SKU fit matrix helps keep those product-specific decisions separate while you explore a shared outer box.
Turn the selected route into a packing instruction
Retain one labelled front view, one rear view and a photograph of the complete loaded pack. Name the jewelry, support and box versions. State the loading order and which part the customer releases first; those details should agree with the sample reviewed.
If the supplier revises the pocket or retaining opening, reopen the observations affected by that change. The sample revision record lets you connect the original catching issue to the requested correction and replacement evidence.
Avoid writing a complex customer instruction to compensate for an unresolved route. A short release note can help explain an intentional construction, but a sample that requires hidden pulling still needs review. Ask whether the retaining arrangement can make the intended sequence clearer.
If you are exploring a jewelry box with insert, attach the front and rear route views to that structural inquiry. Its final retaining details still need a project proposal.
Bring the front and rear route views to Packrivo's packaging inquiry with the actual necklace details and any open contact questions. The useful outcome is a route someone can load and explain, with its release checked on the complete configuration.
Bind the rear route to the same front support
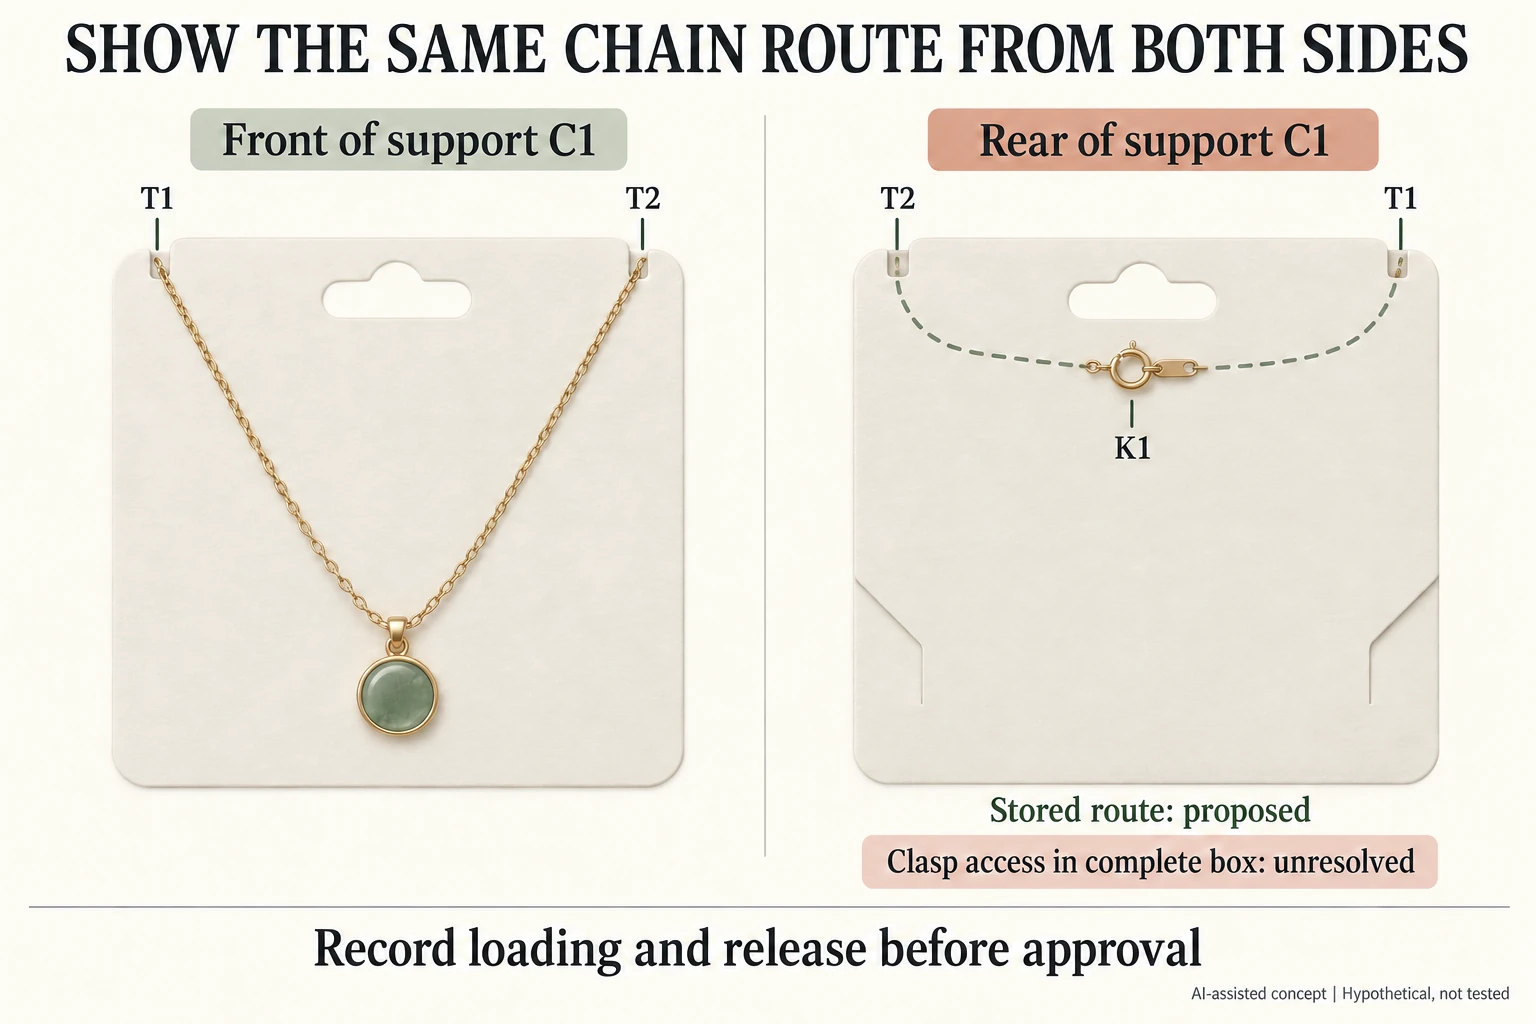
Use invented necklace N1 and support C1 to mark transition points T1/T2 and clasp K1. Front and rear views must identify the same physical points; a rear view reverses their apparent left/right positions. The diagram proposes a route on a loose card, with complete-box access unresolved.
Scroll horizontally if columns extend beyond the view.
| Reference | Proposed role | Evidence still needed |
|---|---|---|
| T1/T2 | Front-to-rear transitions | Actual openings, loading and contact |
| Rear path | Stored chain position | Seating without bunching |
| K1 clasp | Identified release question | Access after C1 is installed |
| Complete box | Support and product together | Actual closing and removal sequence |
Keep both images under C1 rather than combining the front of one revision with the back of another. The dotted rear path is a planning line, not a hidden pocket specification or proof that the chain stays there.
Record when K1 becomes reachable in the complete pack. If the card must move first, name its lifting route instead of telling the recipient to pull hidden links. All CSV observations remain blank here. Supplier instructions and an actual loaded trial must settle loading, contact and release; a visible clasp on a loose card cannot establish access inside the box.
Download the necklace packaging chain routing record (.csv). HYPOTHETICAL rows are invented examples. Use ACTUAL_BLANK for permitted project inputs; replace that row label only when recording actual facts. Empty evidence, observation and date fields mean unknown or not performed, never acceptance. Keep checkpoints and revisions separate.
Send matched front, rear and complete-box references with the actual necklace and unresolved release question. Packrivo coordinates independent suppliers. These records establish no supplier offer, service availability or MOQ exception; its published baseline is 500 pieces per product/design.